Format Options
On this page, and on the Conditional Format page, we describe format options that relate to individual fields in a perspective.
Format actions in the toolbar are also listed in the Format menu, with keyboard shortcuts.
Renaming Fields
To rename a field, move the cell cursor to the field's grey label cell, and type a new name.
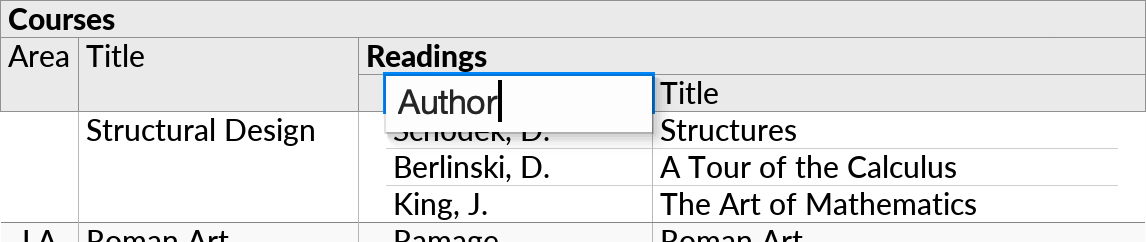
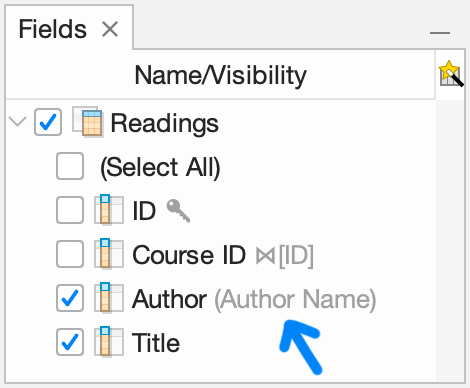
The name change is for display purposes only; the external data source is not affected. When a table column is renamed, the original name is shown in parentheses in the field selector:
Setting a name is useful for formulas, or to abbreviate a long column name to save space.
Auto-Format Field Names
Table and column names may be adjusted automatically for display purposes. For example, a field that is named START_DATE or startDate in the data source may be shown as “Start Date” in Ultorg.
You can disable or enable such adjustments at the data source level, via the Auto-Format Field Names option in the Data→Other Data Source Options dialog:
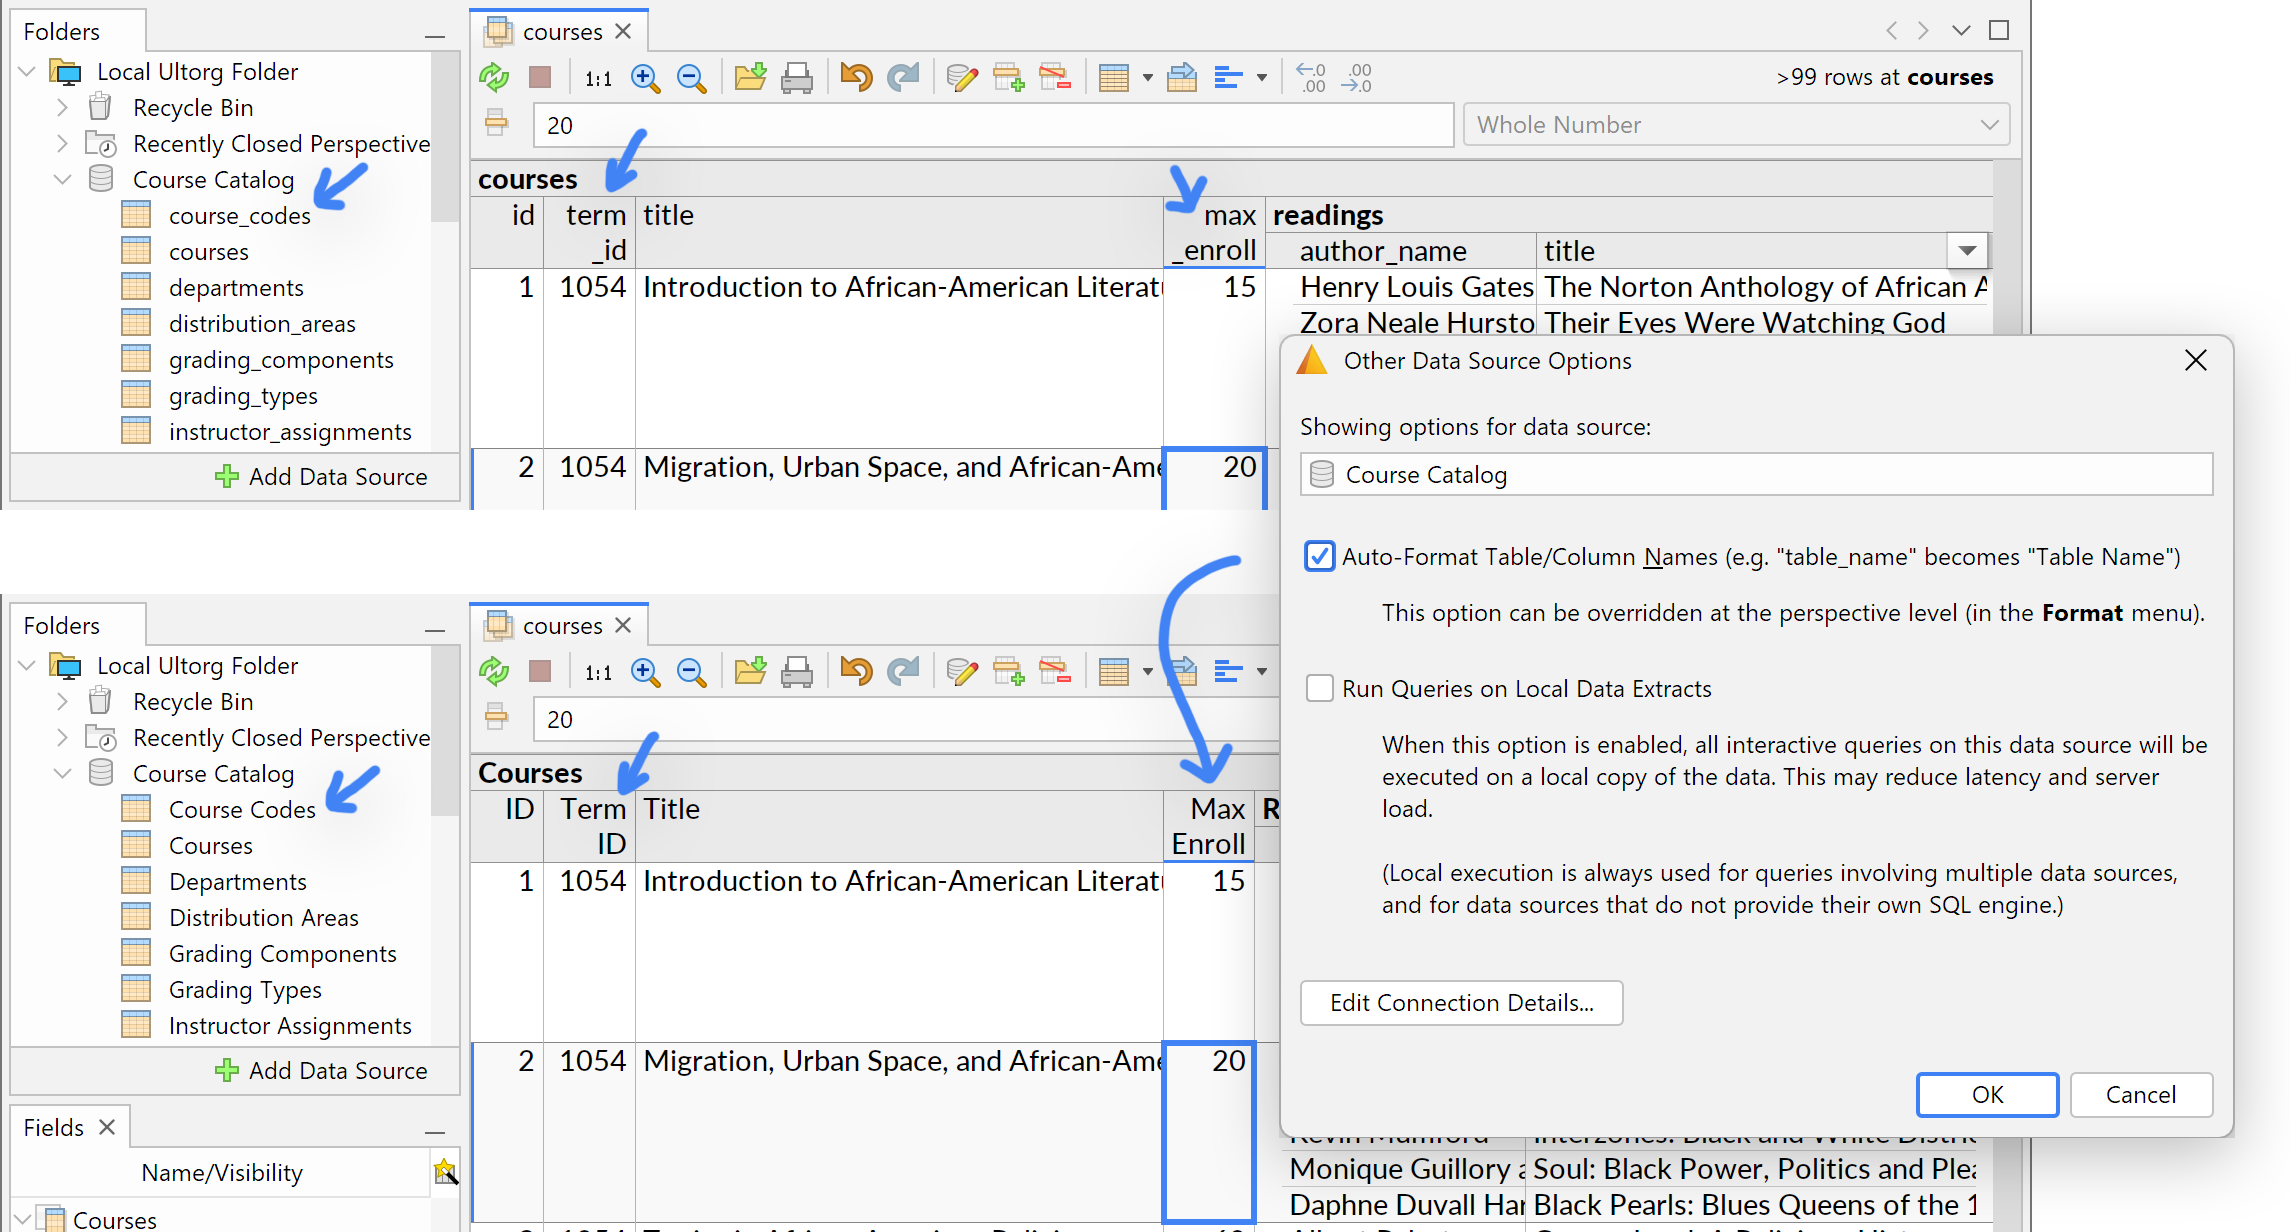
This option is enabled by default for relational database connections, and disabled by default for other kinds of data sources. The setting can be overridden in individual perspectives, via Format→Auto-Format Field Names.
Regardless of formatting style, the layout engine will detect word boundaries in field names for line breaking purposes.
Reordering Fields
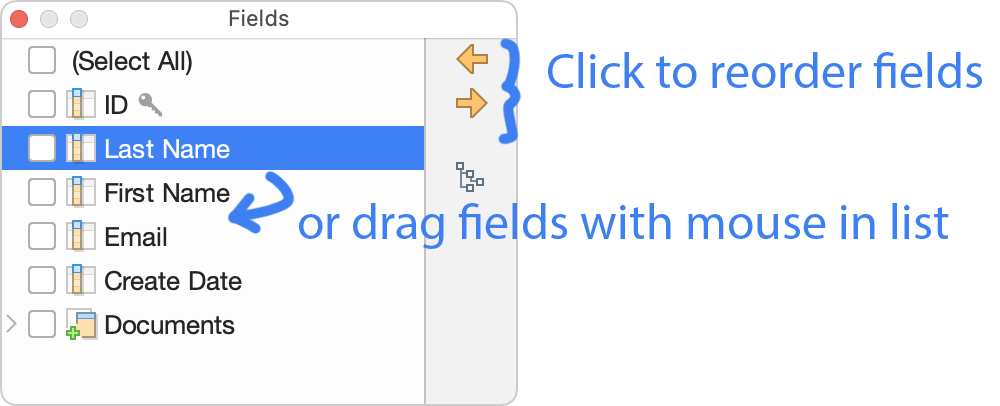
You can reorder fields for display purposes by dragging them up or down in the field selector. Or, use the ![]() Move Left/Up and
Move Left/Up and ![]() Move Right/Down actions (Alt+Shift+Left/Right) to move the currently selected field(s) in the perspective layout.
Move Right/Down actions (Alt+Shift+Left/Right) to move the currently selected field(s) in the perspective layout.
The order of fields has no effect on query results, except in some cases with respect to the ordering of returned rows for which no explicit sorting is defined.
Drag to Resize Columns
The width of table columns is normally set automatically, and may change dynamically depending on available space.
You can override column widths by dragging the edge of a table column header. Double-click to restore the automatic setting. Drag-to-resize also works when multiple columns are selected.

Frozen Column/Heading
In wide table layouts, one or more heading columns can be configured to stay frozen during horizontal scrolling. This setting will be auto-detected by default.
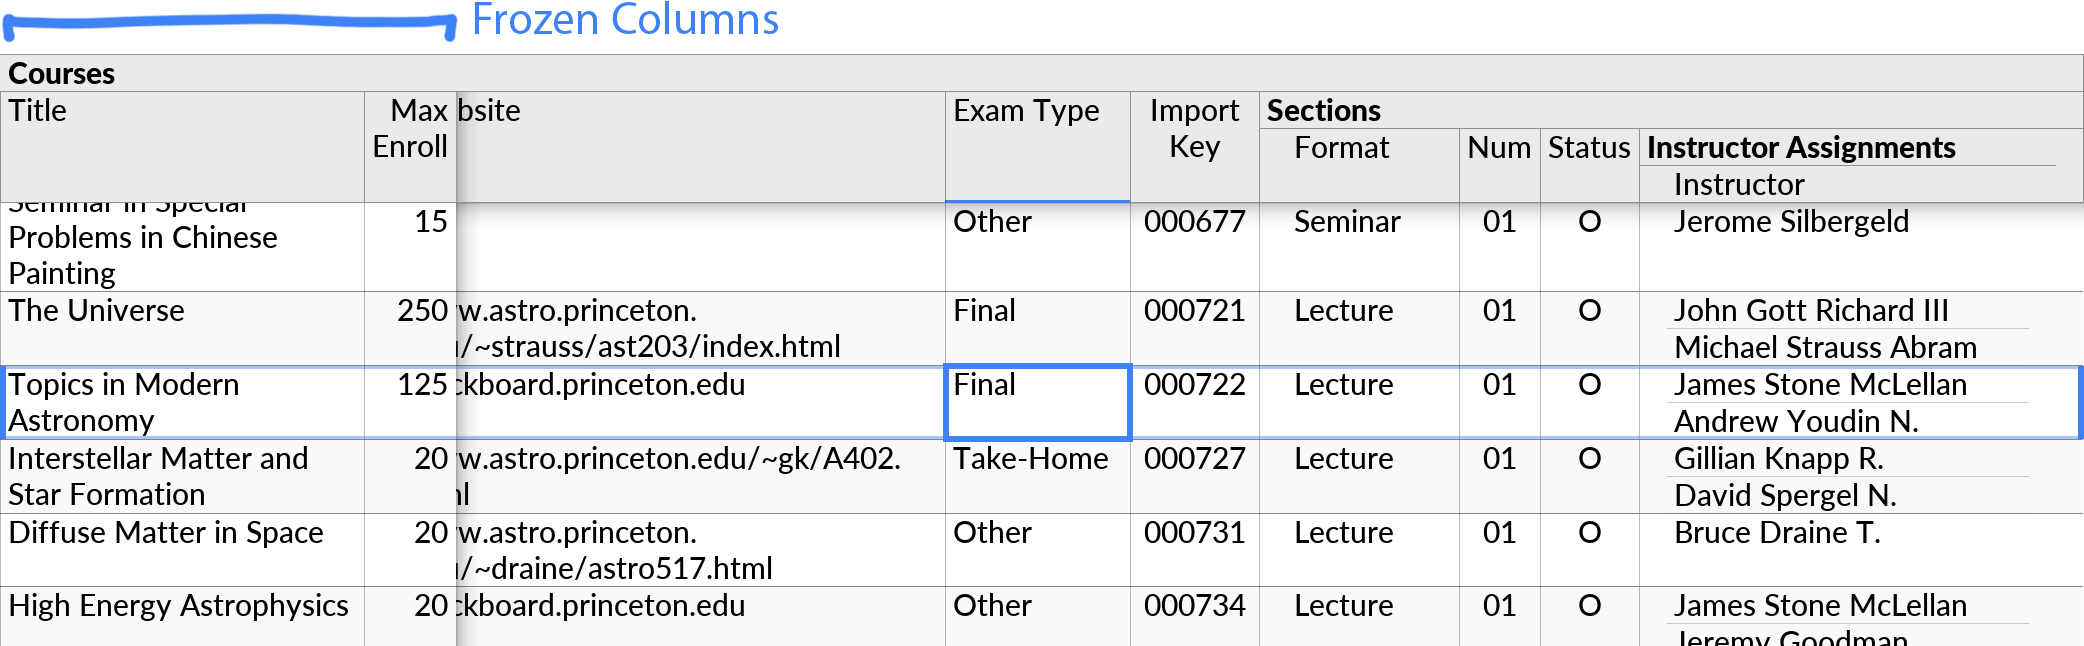
To toggle whether a column should freeze or not, select any cell in the column, and click the Frozen Column/Heading (![]() ) button in the toolbar. Or, press Ctrl+6 (⌘6 on Mac). Frozen columns can be from any subquery, and need not be adjacent.
) button in the toolbar. Or, press Ctrl+6 (⌘6 on Mac). Frozen columns can be from any subquery, and need not be adjacent.
Any primitive field can be used as a frozen column, including formulas.
The Frozen Column/Heading option is also used to control headings in form layouts.
Decimal Precision
For fields containing fractional numbers, you can adjust the number of decimals shown using the Increase Decimals (![]() ) and Decrease Decimals (
) and Decrease Decimals (![]() ) buttons in the toolbar. This also works for time and timestamp fields, which may display minutes, seconds, or fractional seconds.
) buttons in the toolbar. This also works for time and timestamp fields, which may display minutes, seconds, or fractional seconds.
If no explicit setting is made, Ultorg will use a default based on values observed in the data.
For timestamp fields, a Show Date Only option is available in the Format popup. This option is used automatically for timestamps that are observed to always fall on midnight.
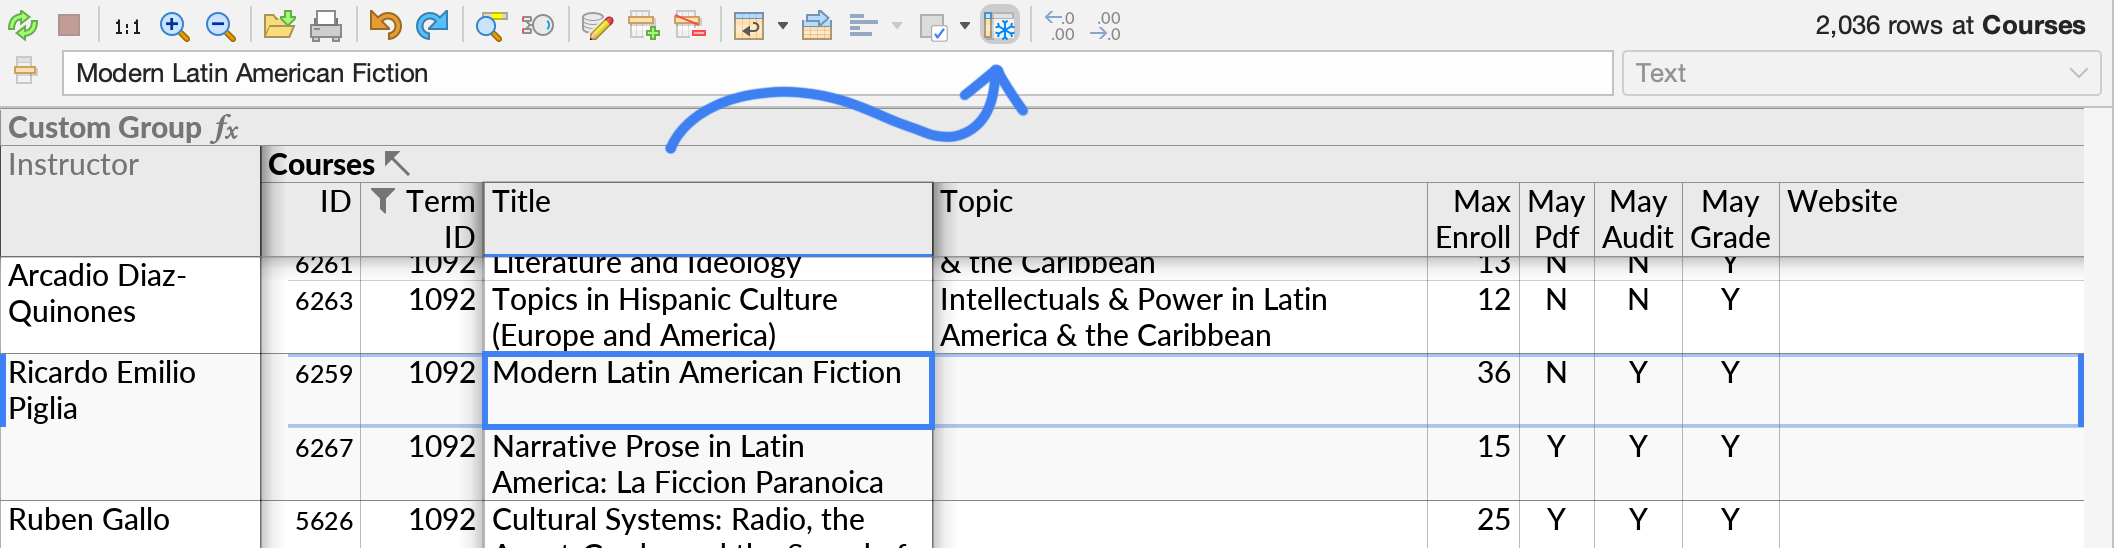
The Format Popup
To see all relevant format options for a particular field, click Format/Options in the field's context menu, or press Ctrl+1 (⌘1 on Mac). This opens the Format popup:
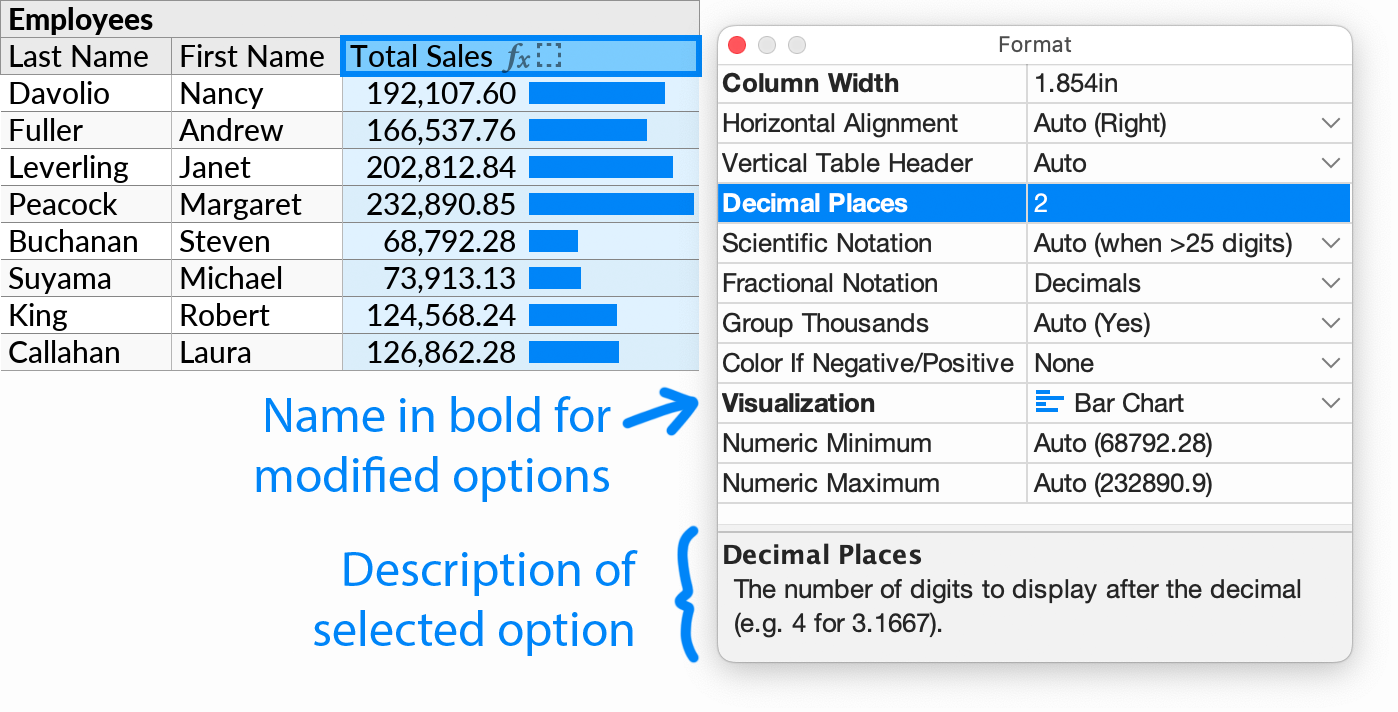
The specific options displayed depend on the data type of the field, and in some cases the values selected for prior options. For example, the Text Fit option is shown only for text fields. At the bottom of the popup is a short description of the currently selected option.
Some options require a number or other input to be entered. To edit these, click the existing value, enter the new value, and press Enter. To restore the option to its default, enter an empty value. For options with a dropdown list of available values, the default is usually Auto. You can press Ctrl+Z (⌘Z on Mac) to undo a change.
To set options for several fields at once, you can use the Format popup with multiple selection.
Below we describe some of the options available. See Conditional Format for more.
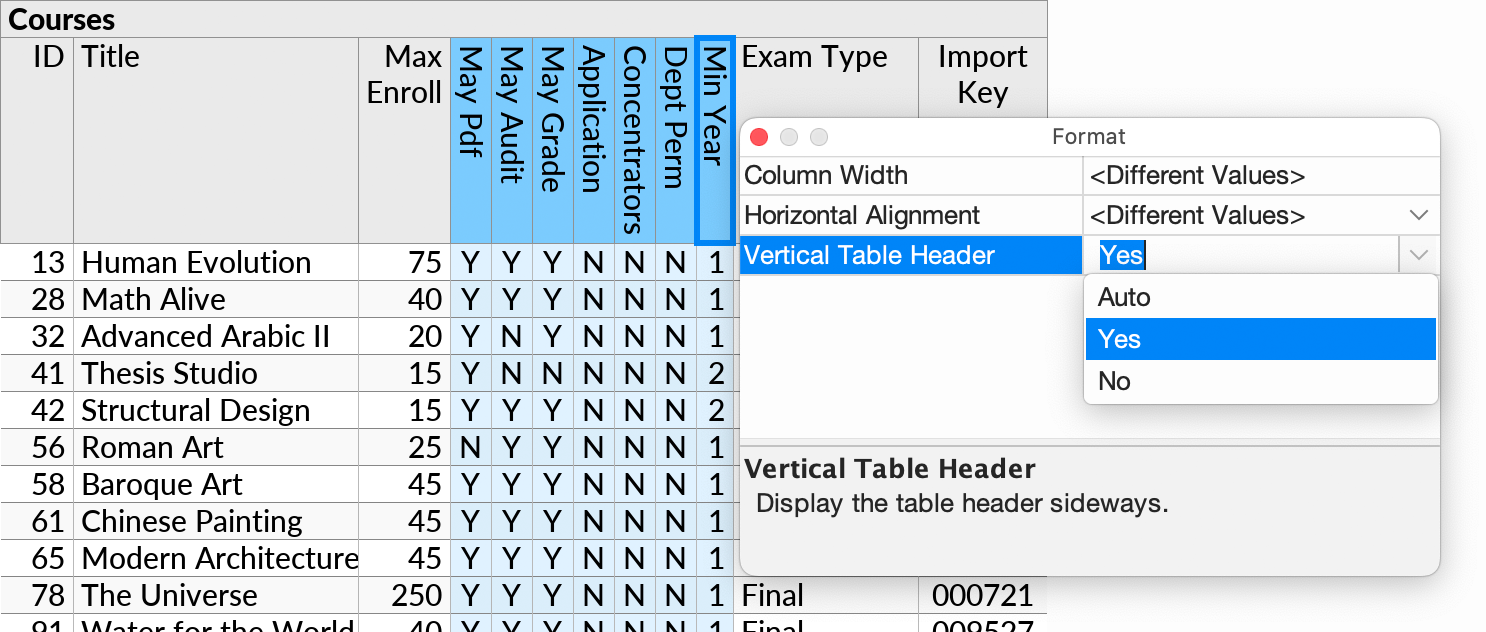
Vertical Table Header
For table columns with narrow data values, the overall table column can often be made narrower by displaying the column name sideways. Ultorg does this by default when horizontal space is limited. You can override the decision here, forcing vertical headers either on or off.
Text Fit
This option concerns the treatment of text values that are too long to fit within the given column width. By default, the option is set based on the layout style selected at the perspective level in the Set Auto-Layout Type dropdown (e.g. ![]() clipped or
clipped or ![]() wrapped).
wrapped).
- Clip: Display text up to the end of the cell. Any overflowing text is hidden.
- Shrink: Decrease the font size as necessary to fit the text, to a limit, then clip.
- Wrap: Display all the text, with line wrapping if necessary, making the cell taller as needed.
The effect of each option is illustrated in the table layout below:
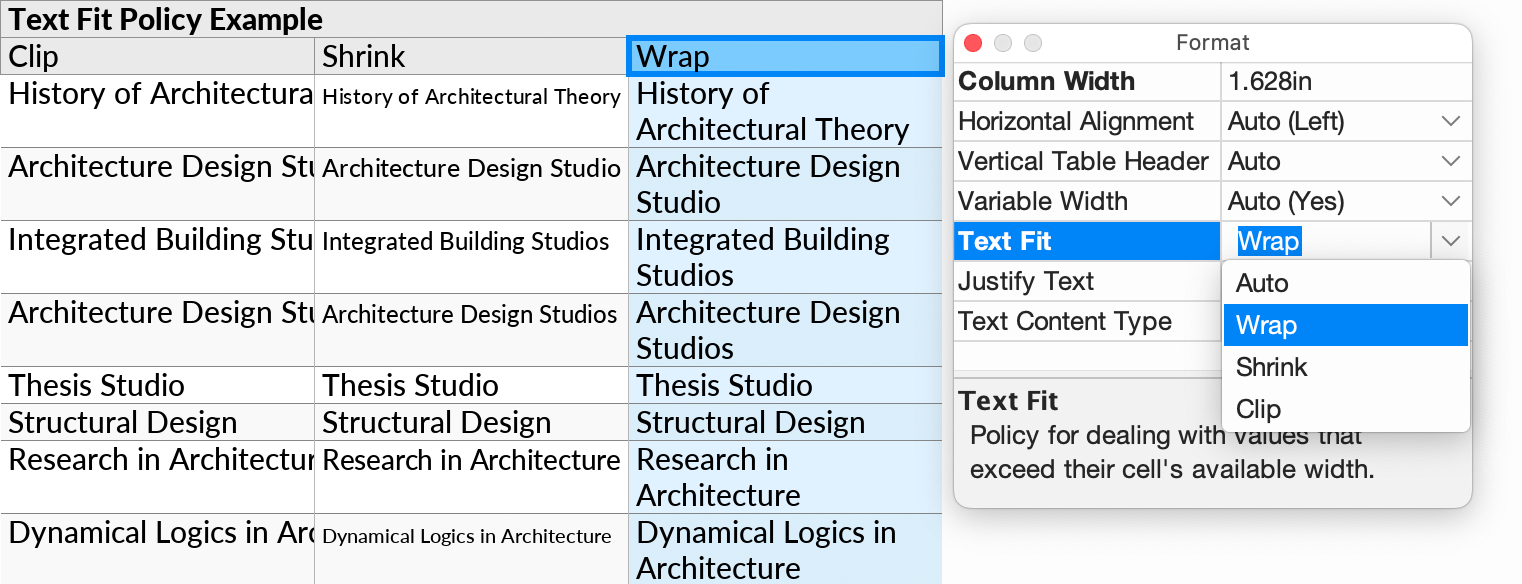
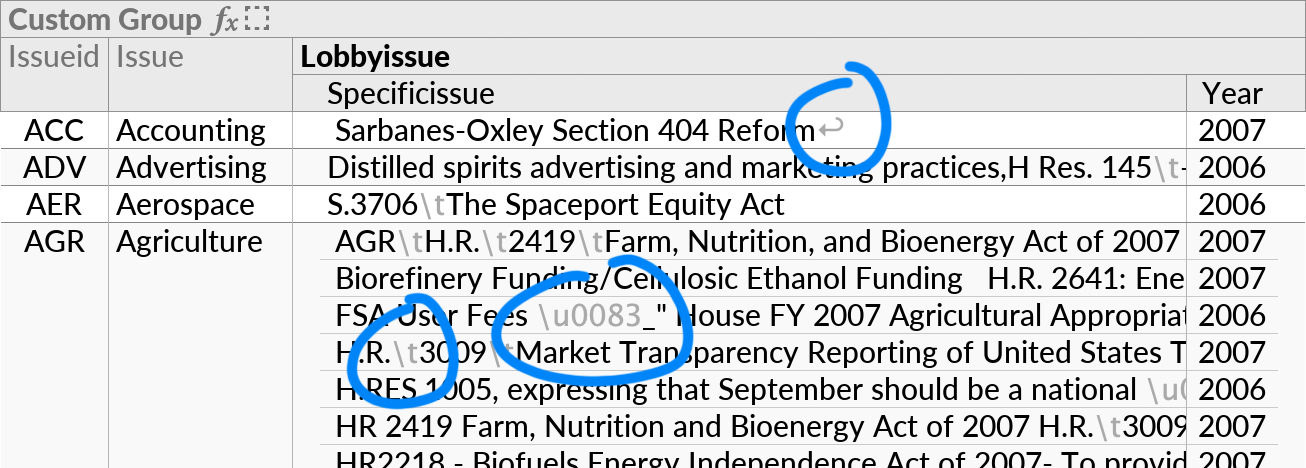
The Clip and Shrink options always display contents on a single line only. If the value itself contains a line break, it is indicated with a placeholder character (↩). Other ASCII control characters are indicated with an escape code, regardless of the text fit policy.
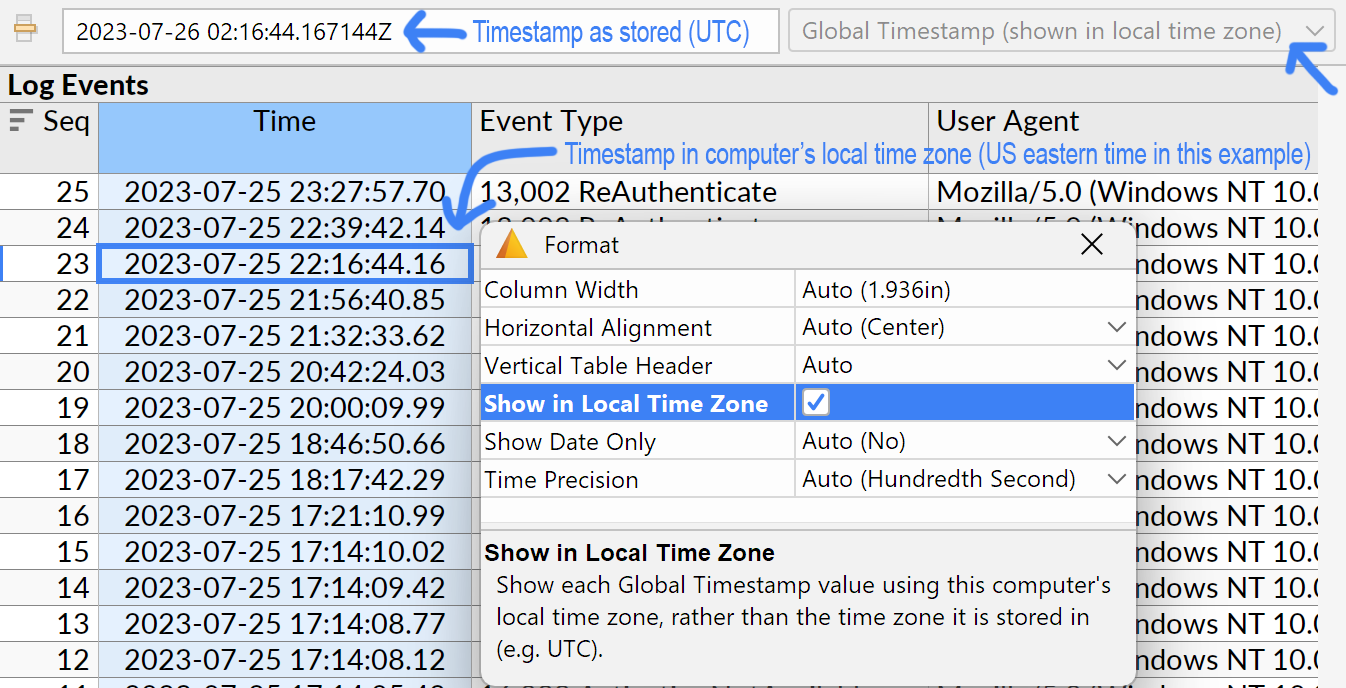
Show in Local Time Zone
This option allows values of the Global Timestamp type to be shown in the computer's local time zone. The formula bar will still show the original stored value (e.g. in UTC on PostgreSQL).
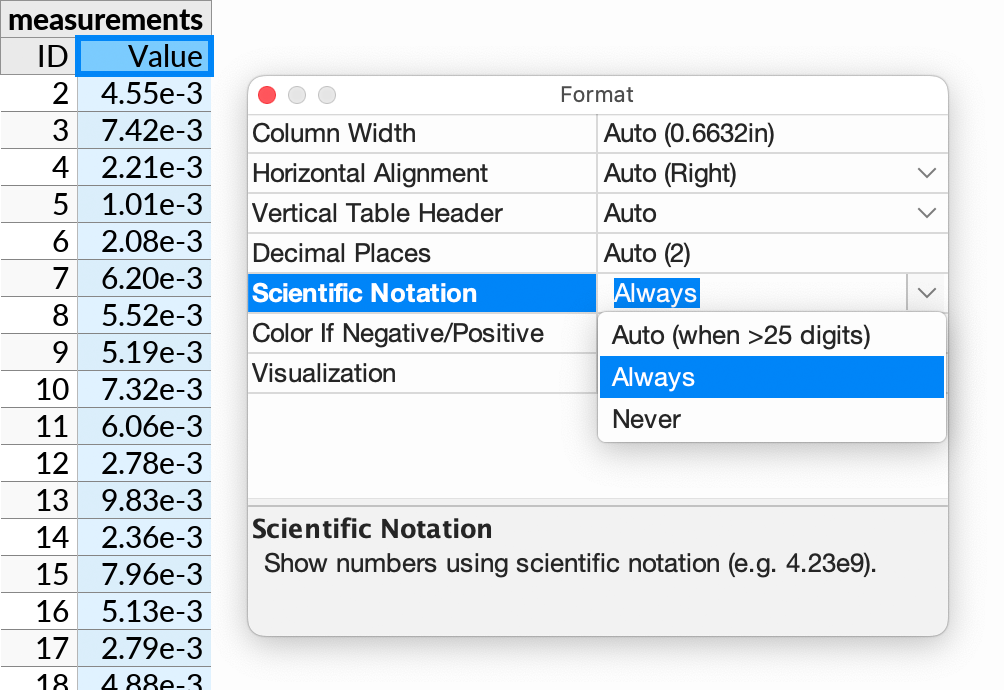
Scientific Notation
Scientific notation is used by default when displaying extremely large numbers (>25 digits). You can force scientific notation on or off for all numbers in the field here.
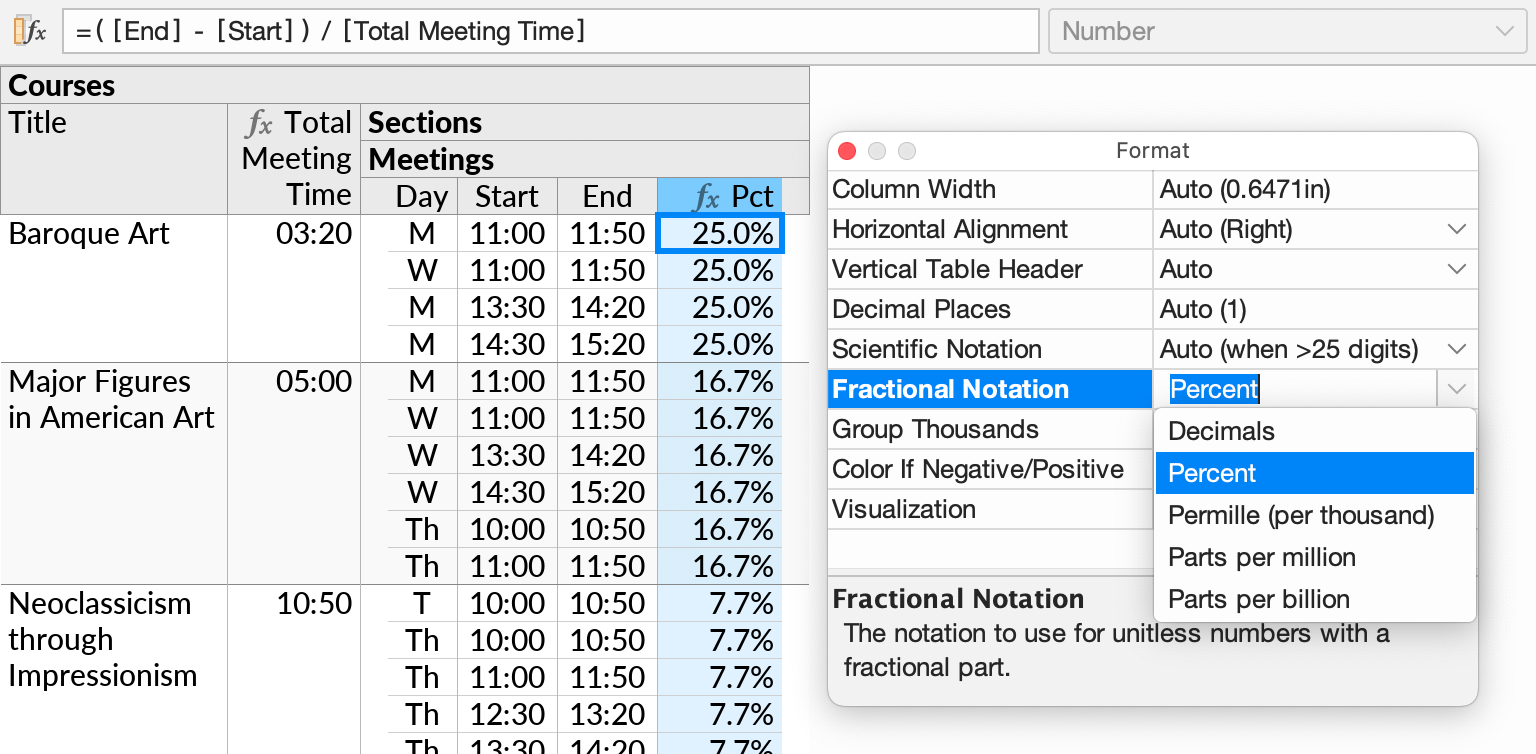
Fractional Notation
Use this option to display a number as a percentage, or using another fractional notation. For example, the number 0.0239 may be displayed as 2.39%, or 23900 ppm (parts per million).
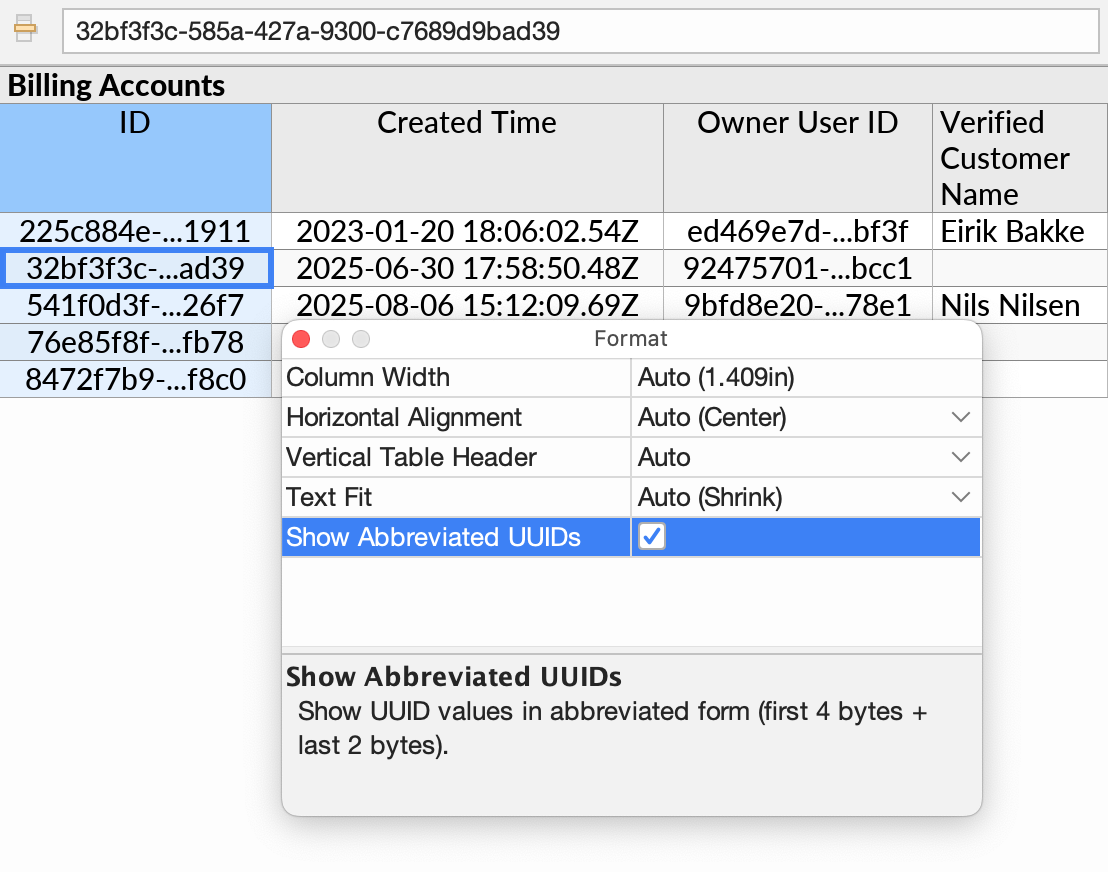
Show Abbreviated UUIDs
UUID values are shown in abbreviated form by default. You can override this if desired. In either case, the complete value is shown in the formula bar.
LaTeX Math Display
Mathematical expressions, written using the LaTeX typesetting language, can be displayed directly in cells. This is useful for certain kinds of scientific and engineering data.
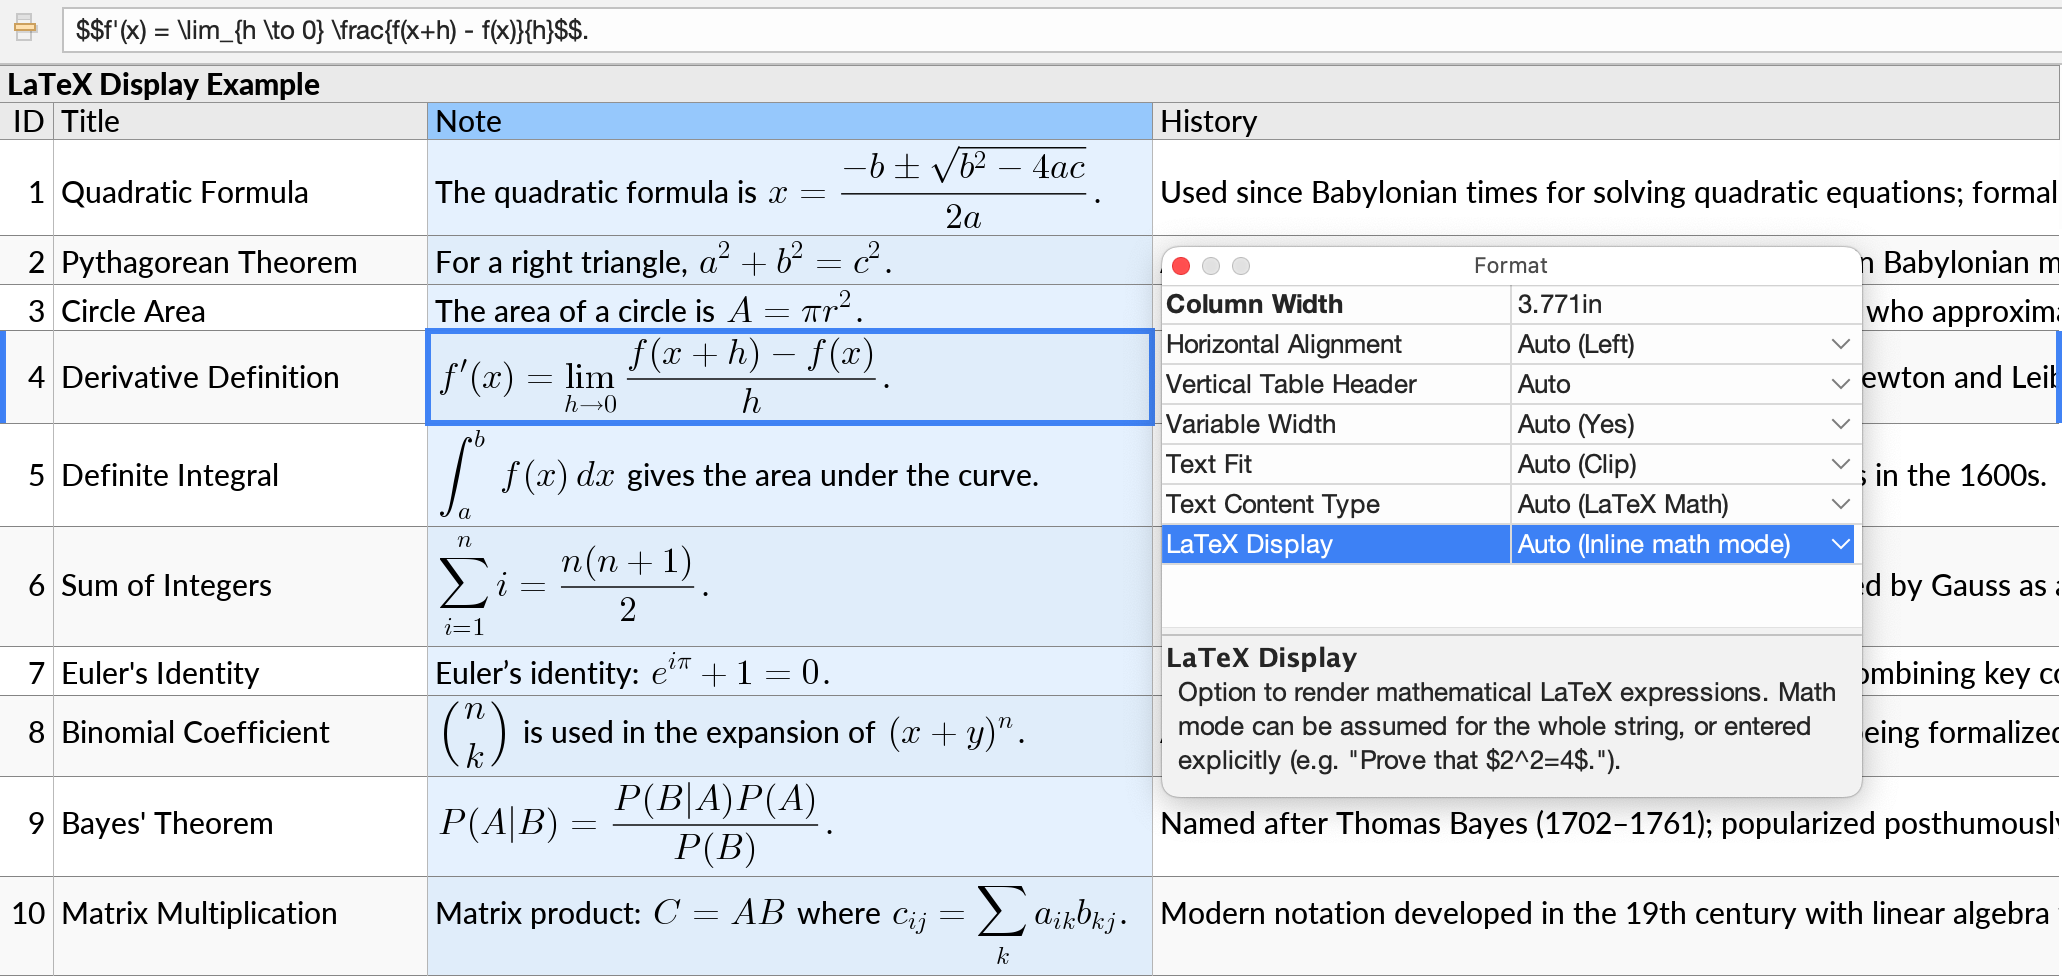
The presence of LaTeX math code is detected automatically in text fields. You can control the setting manually from the Text Content Type and LaTeX Display options in the Format popup.
When LaTeX Display is set to Inline math mode, Ultorg will detect LaTeX math mode expressions in plain text, embedded using standard syntax such as dollar signs ($2+2=4$), brackets (\[2+2=4\]), or macro commands (\begin{equation}2+2=4\end{equation}).
Unparseable or unsupported LaTeX code is shown in red font. Specific warning messages can be seen via Help→Diagnostics→Application Log.
Clear or Remeasure
The Remeasure Layout action (in the Format menu) forces table column widths and other layout measurements to be recomputed based on currently displayed data. The Clear Formatting action resets any overridden format options. These actions apply to the entire current perspective, or any explicitly selected fields.
Alternatively, you can drag or double click column header separators to adjust column widths.
Edit Table Defaults
Format options normally apply to the current perspective only. However, you can customize the defaults that are used for each data table.
To edit table-level formatting defaults, right-click the relevant data table (![]() ) in the Folders sidebar, and click Edit Table Defaults:
) in the Folders sidebar, and click Edit Table Defaults:
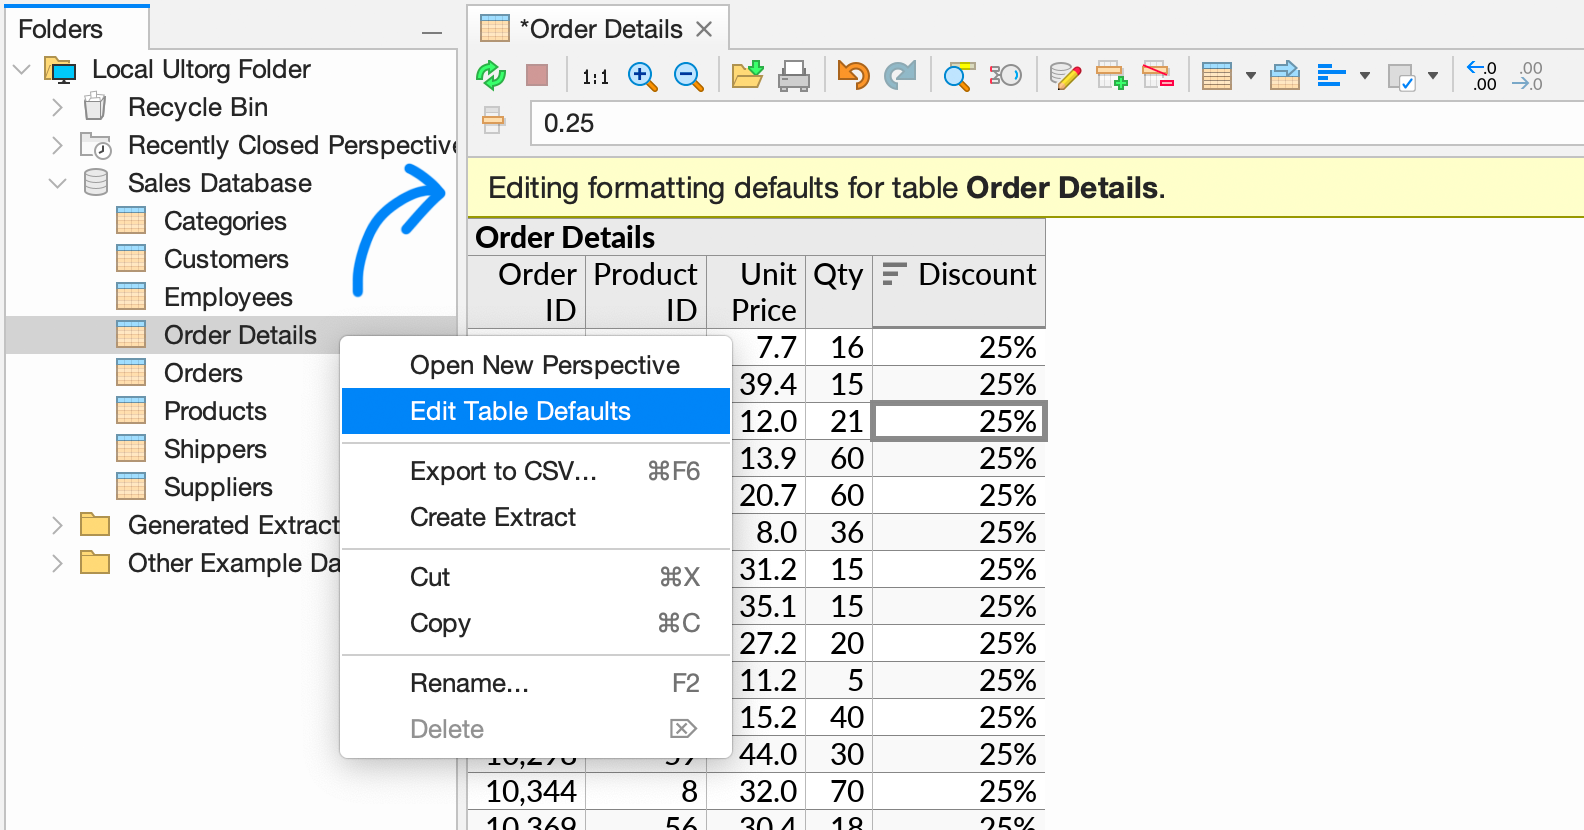
You can then use the Format popup and other actions to set format options, as when working with a regular perspective. You can also use the Sort actions to set a default sort order, or change the default display names of columns.
Table-level formatting defaults apply to all freshly created perspectives, as well as when adding a new join to an existing perspective.